


Master Bedroom January 2011
To cut these three mat boards down and then cut the beveled window, I would say it took me an hour.

I have a Logan Hand Held Mat Cutter that works pretty well. The cut can end up less than straight even when you are holding your breath and pushing the cutter as best you can against the straight edge. BUT this only costs $10-15 at a local craft store. The website I got this image from sells other versions that are supposed to be even more reliable for just a few dollars more.
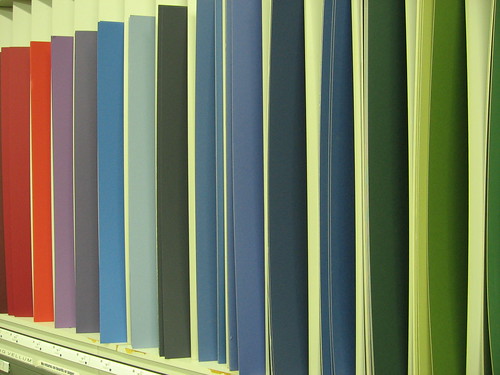
Mat board is so important for protecting you art from the glass. Be prepared to spend twice as much on acid free mat board. The standard size for mat board is 22 x 28". If you are framing something small, you might be able to buy a piece 8 x 10" or 10 x 13" or smaller in the discount bin that most framing shops have where they sell all the windows cut out for large pieces of art work. Places like Michael's don't have a lot of colors for sale at all, and they don't have these discounted windows. When you are trying to coordinate with the room and the artwork, color can be so important.
Steps for cutting mat board:
1. Gather your materials:
mat board
something to cut on (protect the surface below--these are sharp blades)
metal yard stick
metal L shaped ruler is nice too
pencil and eraser
art work
frame measurements
xacto knife
beveled hand held mat cutter
2. Use the xacto knife to cut the mat board down to the size of your frames.
3. On the back of the mat board, draw out the window you are going to cut for your frame, with the lines longer than each other/intersecting at the edges.
4. Hold your yard stick on the outside of the window, against your first line.
5. Start 1/4" before the edge of the line, and start dragging--holding your yard stick firmly (I hold it with my knee at the bottom and my other hand at the top) and pulling at a consistent rate.
6. Repeat on the other sides.
7. Check the front side for any mistakes. I have learned that a dull blade tears apart the layers of paper in the mat board. Get new blades! But in the meantime, lightly sand the opening where there is bits of paper that make that bevel look bad.
8. Assemble the backing, artwork, mat, and put it in the frame. Acid free tape comes in handy here for attaching the art to the backing or the edge of the mat. It is worth the money. It will last you a long time and bring you peace of mind.
Practicing first is such a confidence booster. Use some excess mat board (a benefit of doing your own) or buy one from the discount bin and try a smaller size first to perfect your technique.
Happy framing!
Happy framing!
No comments:
Post a Comment